So today I was moderately good*. I worked for a bit on my essay, mainly formulating questions to send to university. And I went and got the bits to make the Pop Filter / Suspension Mic Mount. This is based on a couple of other folks work (see the bottom for linkage). I warn you, this is not a full on instructable, otherwise I’d put it on there.
So, for this you need the Ikea Tertial Lamp (or another cheap anglepoise you don’t mind ruining), a gooseneck lamp of some sort (I got mine from Ikea, but can’t find it on the website), and a 4″ soil pipe “single socket” (apologies stateside people, I’ve no idea what this is called there, but it looks) like this:

You also need a teeny tiny L bracket (I made one from an Ikea bookcase hold-to-the-wall mount that we’d never used; because I’m attrociously cheap), a pair of tights (or a hold ups, or whatever) and some hairbands. For the sake of prettyness I got the non-metal clip variety, but I’m not convinced it matters if there’s a metal clamp holding the hairband in a loop.

So, you carefully cut that sealing ring off the end of the single socket – keeping the seal intact. This should give you a clip-together ring with a rubber seal in it. Keep this.
The remainder of the tube you mark and cut such that you end up with four prongs each side of a centre strip. I made the prongs about 2cm wide, which on the socket I’ve got made the chunks I cut out ~7.25cm each. This was achieved with a hacksaw and my friend’s Dremel. Do it in a well ventilated area, PVC smells hideous when you’re cutting it.

Carefully cut out those pieces. Resist the urge to hit them with anything or use brute force when you can’t get them out because you’ve not quite cut through them because you’re trying to make it neater than your first attempt and you can’t find your stanley knife. Because otherwise you break it (like I did). Thankfully I had the one I screwed up from ages ago, which is ‘good enough’ because I’m not spending any more sodding money on my cheap microphone mount!
Anyhow.
Back to the story.
So then you file some little notches in each side of the prongs about midway down their length. These will hold the hairbands in place when you assemble it all. Clean the whole thing up with a file and/or sandpaper.
Then you need to disassemble the lamp. You want the gooseneck out of the gooseneck lamp, and that’s all. Depending on how it’s constructed that can be a bit of a pig:

There was deep joy when I located that nut. Incidentally, Ikea’s clip together lamp holders are a sin against nature.
Similarly, you don’t want the lampshade on the anglepoise (I worked on both things together, because I’m weird like that).

Unscrew the cable clip (if you want to save things), and you can unclip the lamp holder with a small screwdriver popped through the slots in the shade. It’s not particularly difficult, although getting the cable out proved to be a bit of a challenge. Anyhow, remove the cable from the lamp holder, the lampholder from the shade and then the shade from the anglepoise frame. The wire should, with a bit of wiggling and some carefully applied pulling, unthread from the frame.
Then mark and drill a couple of holes in your chopped up bit of pipe, and pop screws through. I ended up replacing the screws, the ones provided were long enough if I countersunk the holes, but I was a bit wary of taking the thickness of the PVC back that much.

In that shot you can see an early attempt at a mount for the gooseneck. It was made from an Ikea bookshelf wall mount I had lying around, it didn’t work, ignore it.
Now, if you’re using the same gooseneck lamp from Ikea that I was using – find a screw that fits in the screwhole at the base of the lamp that’s a smidge longer than the existing one (ah, the giant box o’screws), drill out the top hole of the anglepoise just a smidge, and attach the gooseneck.
Then take that sealing ring you cut off at the beginning and file down any rough edges. I used that mangled bit of metal to make a little L bracket to attach it to the gooseneck, and use the original bolt off the gooseneck to attach the L bracket to the gooseneck. Mark and drill a hole through the edge of the sealing ring (I just ignored the rubber seal, do as you will with it), and then pop the sealing ring apart with a screwdriver. Pull the tights over the ring so that you end up with a single layer of taught nylon over the ring, and then clip it back together holding the nylon in the middle. Trim the nylon off – if you pull it a little taughter, the rough edges will disappear back into the seal. If not, you’ll end up with what I got the second time, because I damaged the nylon mounting it, and decided to repeat the process… and didn’t manage to get it quite taught enough, thus have slightly irritating little bits of nylon sticking out.
Raid that screw box for one last screw and nut – to hold the pop filter onto the L bracket. Careful you don’t snag the nylon… :-/
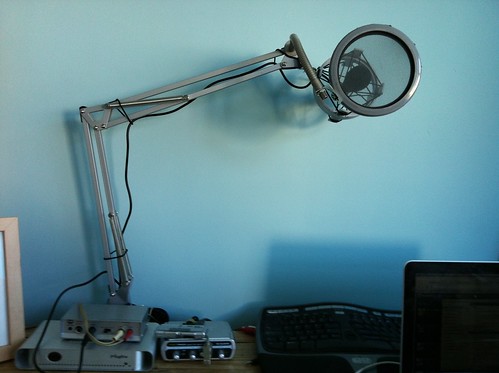
Finally use those hairbands to loop over the prongs on the suspension mount and slip your microphone through:

Attach to the desk, stand back and admire.
Tomorrow expect a post about this nasty cheap object:

Linkage:
DIY Pop filter Instructables
DIY Shock Mount
* Or moderately god – which is what I wrote first…