So the mixer is now in even more bits. I’ve ordered some pre-paint wipes to see if I can get a better finish on this than I usually get, since it would be nice if it actually looks good after this process (in addition to, ideally, actually functioning). I’m not quite sure what the history of this mixer is because the more I take it to bits the more it seems to have been attacked with a spade, beaten into a thousand bits and put back together from more than one machine.
Having found a manual – and some pictures of other Assistent N8s (I think it’s an N8), it appears the knobs should actually be the same colour – our sports one black and one white knob.
And having dismantled it, someone’s clearly changed out the motor (I’m suspecting for an earlier one, actually, because the insulation on the motor looks older than what I suspect is PVC on the switches). Anyway, I pulled one of the chocolate blocks out that was doing duty connecting one side of the motor and soldered that section of cable together. Mainly that’s because I was putting heatshrink over a section of cable where the insulation had worn through so I had to pop that chocolate block out anyway:

I cleaned up the inside of the mixer’s base which was filthy and is now much more acceptable:

And I worked out where the loose bits of plastic came from:

I’ve stuck them back in place (not because they’re important, just for the sake of completeness) – so they’re drying overnight. As is the front panel which is all clamped together but beforehand looked like this:

It’s actually got a multitude of small cracks in it – I wonder if it got dropped on its front? But I don’t know how you’d do that because the back of it is the (much) heavier end. Unless maybe it fell of a shelf onto work surface? But to do the amount of damage it’s had it seems like it would need a fair smack.
Anyhow, while I was just looking it over before stopping for the day I discovered that the insulation on one of the wires from the power connector had worn through. So I then disconnected it – at which point I finally twigged that someone has soldered the replacement wires to the power inlet – but the power inlet has actually got threaded screw holes…! So, err, not sure what happened to the screws. Anyhow, I soldered the cable back on since I’m not sure I have a tap or an appropriate size screw. I kind of wish I had some suitably beefy cable kicking around to replace the whole lot, but I don’t. Most of the stuff I’ve got is low voltage.
Maybe I’ll do that at some point.
Anyhow – for the moment I’m concentrating on functional, clean and a bit prettier.
So I’m planning to make a new front panel to replace the mangled original – so far I’ve come up with this:
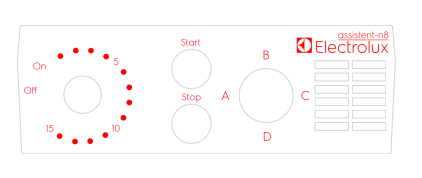
Which I’m planning to cut out of perspex on the laser cutter. I’ll actually flip it to print it so it can etch the text in the back – then I’ll (hopefully) spray it to fill that text in – before cleaning the back off and spraying it a different colour. I originally thought about recreating the 1950s Electrolux font / logo, but I decided that actually a pseudo-replica of the modern one will do just fine.
However, there’s a couple of important tweaks that I’m going to make – it’s going to have a few screw holes in it so that I can use the perspex to brace the poor, battered old original mounting plate. There’s only so much that JB Weld can do – and while I think it’s going to be better than it *was* (not a hard challenge), it’d be more likely to survive with some bracing.
In other news – I’ve put up a bunch of shelves in the garage now, which has helped with organization in there :)