Somewhat disjointed progress, since we’ve been working on multiple unconnected things.
Let’s start with the floofy ones. We got some chickens after a couple of false starts – turns out a lot of people with chickens are terrible at contacting you. Also, for some reason, our wanting to buy chickens coincided with other people having a thoroughly miserable time. One person’s partner had multiple migraines, another person’s dog died…
We also had to put up the run (the coop build I’ve wittered about already, but we did paint it). A large amount of treated lumber, some swearing at hardware cloth (thank you Sarah!) and some of our spare chicken wire later and we have something that has very little relation to right angles or verticality, but does ‘follow the contours of the land‘* and also seemed appropriate for containing small dinosaurs.
In the end, after we managed to navigate the disasters we seemed to be causing in other people’s lives, and actually found someone really nice to sell us them, Pippi (Longstocking, obvs) and Mymble (as in Tove Jansson’s moomin books) came to join the fam’. Mymble is slightly suspect for being a boy and we’re not allowed roosters in the city, but they said they’d trade them out if they turn out to be a roo, Pippi seems fairly certain to be a girl.

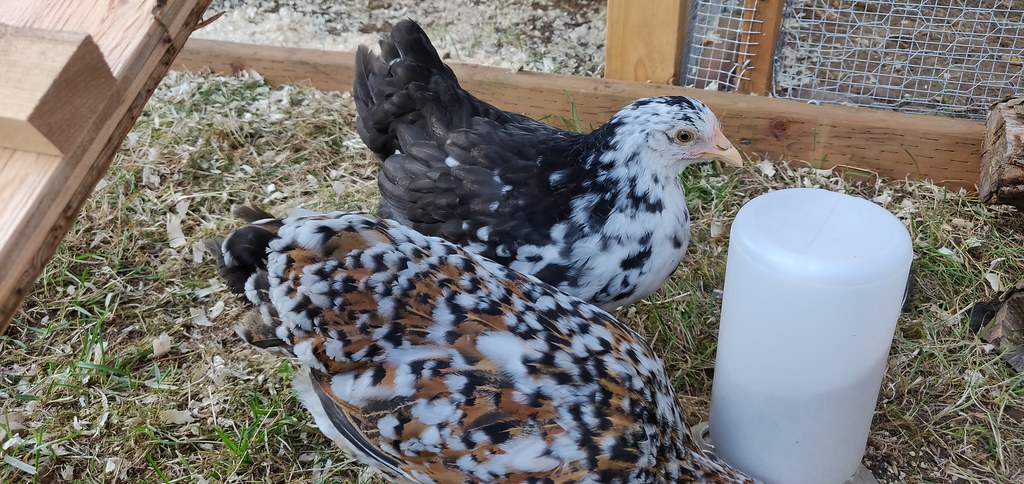
They’re both Swedish Flower Hens, which are a landrace** breed (they basically Darwin’d themselves into existence on Swedish farms). That, unsurprisingly, means they don’t have niceties like feather patterns or colouration that disinguishes which sex they are. You just have to look at them and go “well, you don’t look like you have a huge comb” and “your feet and legs aren’t too big” and pray that’s a girl chicken, not a boy. We’d actually hoped to get a third chook but wanted a different breed, and it turned out that they only had one other chicken of a similar age and they’re looking quite roostery.
Still, we’re going to check in on them in a few more days and hopefully that little birdling will not be looking more roostery; otherwise we might go looking somewhere else. We did look at one other person’s birds, but weren’t happy with the condition of their feet (fearing scaly leg mites***), so took a pass on them.
Pippi and Mymble seem to be settling in fine, they’re clearly geniuses of the bird world having worked out the water feeding nipples more or less independently (we showed one of them, once, right when we moved them) and the ladder into the coop with minimal intervention and just the one day of ‘using Kate as an adventure playground and roost, rather than going into the coop’.
Readers, please note: only my left shoulder is approved as a chicken roost by Pippi and Mymble; my right shoulder is terribly, terribly unsuitable.
Sadly? Fortunately?… No video exists of this experience which mainly had me giggling as it became rapidly apparent that I was not going to win on persuading them in to the coop by myself.
That was day 3 of ‘putting chickens to bed’. Day 4, they just went in, all on their own. Same on day 5. We just have to pootle out and shut the door.
The other main job we’ve been working on is the kitchen worktops. Having decided that “thousands of dollars” was a ridiculous amount to pay for kitchen worktops, but also that having built one side that was 3m long, and therefore realising we were unlikely to get leftovers from someone else’s project that would do the job either — we’d been hunting for a solution that would come in more at a price point we were willing to pay.
Eventually we settled on zinc worktops (which should patina up nicely). First we asked someone about making them – and they gave us just as ridiculous a quote as everyone else for every other material. And none of these quotes included installation, so far as I could tell. So we decided to try and do it ourselves.
So we ordered a roll of zinc. Well, three, actually. Two for the counters, one for the cooker backsplash. We also ordered a large quantity of 3/4″ plywood – two layers of which (glued and screwed together) would make roughly a standard thickness counter. Well, the gluing didn’t go quite as well as hoped – I’d opted for construction adhesive initially because then – I’d hoped – we could use it for both jobs (not the ideal glue I’ll admit, but kind of an average for both).

Unfortunately, the smaller of the two didn’t bond together well – so we ended up throwing a gallon of wood glue into split between the two boards and then clamping them together a second time – which needed a whole ‘nother day to dry. That mean that we didn’t get to start with the easier, shorter worktop for wrapping the zinc, because it was still drying.
Instead the first glue and fold we did was on the long worktop.
So the gluing – we definitely don’t have enough weight or big enough clamps (can’t reach the actual board from the edge with the overlap required to cover the sides and the underside). That is definitely the case. Also, we worked out after we did it the way we should have got the metal sheet positioned, because it didn’t land where we wanted it to, not at all. Also, we should have done this the other way up – using the offcuts from the plywood to support the metal sheet, then dumping the heavy wood onto the metal. That way, the wood would have added it’s weight to the piled on piece of stuff making the contact adhesive stick. Instead, it was just our pressure and then piling paint tins, blocks, bricks, bits of random wood. The gluing worked…ish, and the positioning should work, but it’s not… generous.

Also, folding it is a thousand nightmares. We don’t have a nice jig, nor fancy metal folding machinery, just a rubber mallet and our arms. The first fold – the one on the back that we don’t care about – is not great. Partly because it took a couple of attempts to settle on ‘just beat the sh*t out of it with a rubber mallet’ as the “best” technique. I’d tried applying gentle force with a bit of wood running back and forth along the length of it (nope). I’d tried hitting it with a hammer using a bit of wood as a protector (works, but dents it a lot). I’d tried swearing at it vigorously (not effective, but therapeutic). But both of us whaling on it – taking turns – with the rubber mallet and working outwards from the centre? That seems to work.
I mean, it’s not a nice pin sharp corner with smooth verticals.
That is definitely not what it is.
But it’s looking okay.
Unfortunately, even with our temporary shade (Kathryn’s cunning plan of stringing the tarp between the house and the garage), the gap at the side of the house is very warm and catches sun all morning. In the afternoon it’s just hot there, though, but well shaded. Hopefully we can get the big one done tomorrow (today it’s going to be way too hot for sure at 31°C); and get the smaller one glued. I’m also wondering if we can use some of the offcuts we have around to make the backing board to wrap the zinc around for behind the cooker (because I forgot to order that when I bought the big sheets for the counter).
So that’s slow, but definite progress.
We still haven’t chosen handles for the kitchen cupboards.
Which leads us to the floor. The floor is a constant source of concern. The microcement topping we used didn’t come out smooth – now how much of this is applicator error, and how much is not is a question we’re going to have to resolve when we do the bathroom. But it came out with a suedey texture which is actually really nice to look at, and feels pretty good… but it holds dirt really well. Add to that, that without surface sealing (which we were told wasn’t necessary in light duty areas) you can only lightly clean it with water. Add a cleaning compound or rub at it, and the colour changes, permanently. We have a nice streak by the back door where a slug found its way in that demonstrates that quite well.
So thaaaaat’s not going to work long (or even medium) term. It’s becoming increasingly problematic, so we think (maybe) we’re going to try and polish it and then seal it. Which is quietly terrifying.
The theory being that if we fuck it up we’d have to do something else with it anyway. That may end up being tiling the bloody thing with slate (because the colour we went for is effectively slate, and looks really nice), getting someone else to pour a resin floor (lazy, easy), or painting it (meh)… Either way, it’s a pain in the arse.
So at some point we’re going to have to do a test patch, probably in the cupboard somewhere. Then it’ll be renting a floor sander and wishing that we’d done this before we moved in (but we didn’t know… and really, didn’t have time).
Meh.
The main big project over the next few weeks however, is the trim. Which I keep saying but we’re not getting to, but is actually true. I’m off work for a couple of weeks and apart from us going to spend a little time walking out in the wilds, we’re mainly going to be putting a concerted effort into getting the outside of the house finished. So… err, hopefully that will be a big job done :)
*Definitely not an excuse for “we just threw it on the ground”.
**I have learned more about chickens than I ever knew in the past few weeks. Mainly from Storey’s Guide to Raising Chickens by Gail Damerow, but also from rando blog posts on t’internet.
*** It’s amazing what you can learn.