Tag: hackery

  • Success in limited ways

    So, the plan is to run Home Assistant. If you’ve not gathered that already.

    Why? I dunno. Because it interests me. Things I’d like to do with HA:

    • Monitor the charging stations
    • Monitor the solar
    • Maybe use the solar to restrict charging during solar hours, although not sure it’s worth it since we don’t have a Time Of Use tariff
    • Monitor the status of the chicken coop door (is it really open, is it really closed?)
    • Maybe control the coop door (just for shits and giggles, really, since we have a remote in the house)
    • Monitor our local air-quality
    • If I get really fancy, I might connect it to our heatpump, which isn’t terribly good at picking whether it should heat or cool. So it has about a 5-6F range of temperatures in the house that it vacillates around

    I dunno what else. We have smart-lights in the lounge (although I’m still aggravated that one of them randomly changed colour temperature and refused to change back – it *says* it’s the same as the others…but it’s really, really not).

    My original plan:

    • Use the OrangePi I bought to drive a small screen which displays HA on it *and* runs HA.

    This is… it turns out, unfeasible. That’s because despite getting it working, it’s unuseably slow. That’s my bad – I didn’t mean to buy an OrangePi One. I meant to get something with a bit more ooomph. My backup plan was

    • Use my RPi4 that was in my Mycroft prototype.

    Only… I’ve already put that in the Econet server, I remembered…after hunting for it for an hour.

    The remaining RPis are a 1B(?) and 2B. Neither of those is…well, better. My OPi is the 1Gb memory version, so it’s marginally faster than the 2B, probably. 900Mhz plays 1.2Ghz.

    Also, I don’t know where all my flipping MicroSD cards went (they’re probably with the ballpoint pens), because the only “spare” card I can find is a 2Gb unbranded one.

    So the new plan – which I have just enacted is:

    • Buy a new SBC (an OrangePi 5LTS) to run Home Assistant (they happen to be on sale this month! Excellent!). (Don’t forget to install Mushroom, Kate)
    • Setup the OPi for the Home Assistant display I’m planning to build
    • Setup the RPi2 as a camera for the coop (which requires a second WiFi dongle because the one I used to use with it seems to have expired)

    Hopefully this new plan will work well. Now I have a plan though, that means I can start setting the OPi up to be a Home Assistant screen, and I can start making the case for it too, which is going to be a lasercut affair. Whee! More projects!

    I also spent some time working on the Acorn Pocketbook II today. The screen arrived, but it shortly afterwards started doing sad LCD things. It’s got some permanent black pixels in the corner, which is very disappointing, but it clearly wasn’t there when it arrived.

    PXL_20230614_224348032

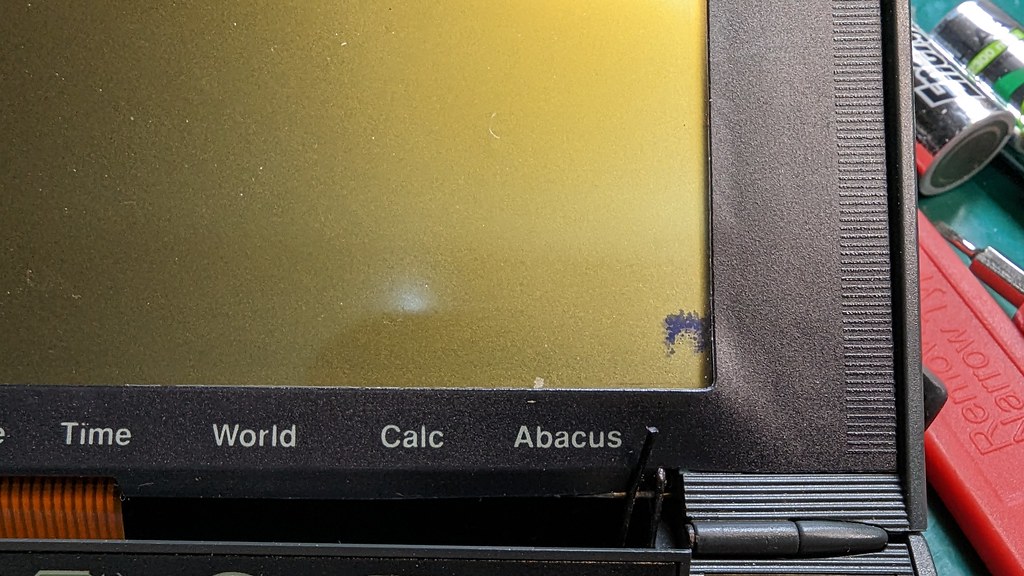
    Also annoyingly, and I’m guessing this is related, the last few lines don’t work on the screen. It’s not a disaster, but after so much work to get it changed it’s rather sad.

    PXL_20230614_224945391

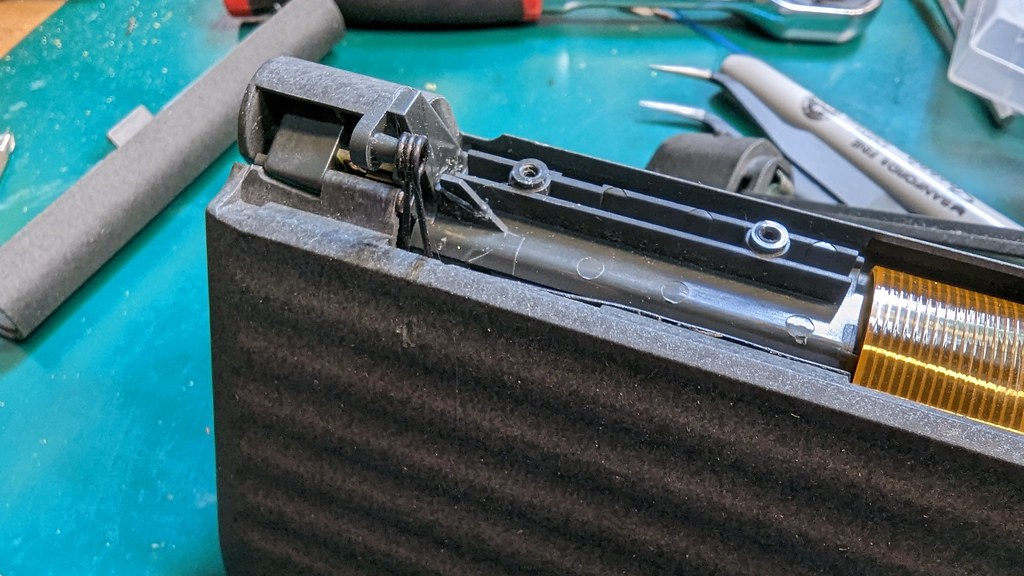
    The main problem is that the hinge/spring mechanism for the button bar disintegrated slightly during assembly (the Psion 3 hurts my soul the way it’s assembled). I tried gluing it – but it didn’t hold, sadly. So now I need to get some Epoxy. But once that’s done it should actually work. In fact, I might be able to build two working ones from the bits I’ve got – one Psion 3a, which will be a bit untidy, and the Pocketbook II which will look neat but have an imperfect screen.

  • OrangePi One Home Assistant

    This is my list of things I threw at the wall trying to make it work – and could obviously be rationalized into only the things you actually need to do to make it install. But since I’ve got it to “running” (with a lot of help), then I’m not going to go back and break it for the sake of working out which bits I didn’t need.

    While this does ‘work’, in the sense of it runs, it’s unusably slow imho, so probably only useful as a proof of concept.

    This based on the OrangePi Debian Buster image, which is more functional than the automated build from armbian (which I did try, but which failed spectacularly).

    Important note: on first boot my system will not detect USB WiFi devices and won’t allow you to enable networking using the onboard system even if they’re compatible with Debian. Letting it complete the first boot and rebooting it afterwards worked for me. The filesystem resize also takes approximately my entire lifetime if you’ve used a big SD card.

    1. Install the newer python (from https://tecadmin.net/how-to-install-python-3-11-on-debian/) – and install dependencies for both home assistant and for building python, oh, and some extra dependencies that seem to be missing from the HA install but that it rudely asked for during installation for me.

    sudo apt-get update

    sudo apt-get upgrade -y

    sudo apt-get install -y python3 python3-dev python3-venv python3-pip bluez libffi-dev libssl-dev libjpeg-dev zlib1g-dev autoconf build-essential libopenjp2-7 libtiff5 libturbojpeg0-dev tzdata ffmpeg liblapack3 liblapack-dev libatlas-base-dev pkg-config wget build-essential libncursesw5-dev libsqlite3-dev tk-dev libgdbm-dev libc6-dev libbz2-dev libffi-dev zlib1g-dev libncurses5-dev zlib1g libreadline-dev libsqlite3-dev make gcc python3-setuptools python-pip

    wget https://www.python.org/ftp/python/3.11.3/Python-3.11.3.tgz

    tar xzf Python-3.11.3.tgz

    cd Python-3.11.3

    ./configure --enable-optimizations (it kept failing with enable optimizations)

    sudo make altinstall

    2. Based on instructions at: https://www.home-assistant.io/installation/linux, get the home assistant user created…

    sudo useradd -rm homeassistant

    sudo mkdir /srv/homeassistant

    sudo chown homeassistant:homeassistant /srv/homeassistant

    3. Remove the old version of rust:

    sudo apt remove rustc

    I also, at some point, installed cryptography and upgraded pyOpenSSL. No idea if this helped or not:


    sudo python3.11 -m pip install wheel

    sudo pip3.11 install --upgrade pip

    sudo pip install --upgrade setuptools


    4. Switch to the home assistant user.


    sudo -u homeassistant -H -s

    cd /srv/homeassistant

    5. Install a new version of rust that meets requirements for home assistant (https://cryptography.io/en/latest/installation/#rust)

    curl --proto '=https' --tlsv1.2 -sSf https://sh.rustup.rs | sh

    source $HOME/.cargo/env

    export PATH=$PATH:~/.cargo/bin

    6. In attempting to fix a later problem, I went back and switched back to my main user and repeated the rust installation. I strongly suspect it isn’t required.

    exit

    curl --proto '=https' --tlsv1.2 -sSf

    https://sh.rustup.rs | sh

    source $HOME/.cargo/env

    export PATH=$PATH:~/.cargo/bin

    7. Then I restarted the shell (logged out and back in).

    8. Next I increased the size of the swap file to give hass more room to build. This makes an 8 Gig swap file in 500Meg chunks to avoid exhausting the memory of the OrangePi One (this takes a long time).

    sudo dd if=/dev/zero of=/swapfile bs=500M count=16

    sudo mkswap /swapfile

    sudo swapon /swapfile

    9. Then for the OrangePi user I installed cryptography and updated pyOpenSSL. I don’t think this is actually necessary, but I did it in the process, and this is was now largely me throwing random solutions desperately at the wall.

    pip install cryptography

    pip3 install pyOpenSSL --upgrade

    10. Then changed back to the home assistant user and repeated those steps, and upgraded SQLite (which I discovered that Hass sulks about when it starts). Because this is the only thing on this system, I obnoxiously overwrite the original SQlite with the new one.

    sudo -u homeassistant -H -s

    cd /srv/homeassistant

    pip install cryptography

    pip3 install pyOpenSSL --upgrade

    wget https://sqlite.org/2023/sqlite-autoconf-3420000.tar.gz
    tar -xvf sqlite-autoconf-3420000.tar.gz
    cd sqlite-autoconf-3420000
    ./configure
    make
    sudo make install

    sudo cp /usr/local/lib/sql /usr/lib/arm-linux-gnueabihf/
    sudo chmod a+x /usr/lib/arm-linux-gnueabihf/sql

    11. And then on with more prep for installation of home assistant.

    Not sure these helped, but I did them in the process – pretty sure they’re unnecessary and don’t work with current versions of home assistant builds, but they were suggested fixes:
    export CRYPTOGRAPHY_DONT_BUILD_RUST=1
    export CARGO_NET_GIT_FETCH_WITH_CLI=true

    12. Use the newer version of python to install Home assistant (https://community.home-assistant.io/t/installing-home-assistant-core-in-a-python-venv-when-your-distros-python-version-is-obsolete/217048)… But I did that using the current home assistant version. This got me to building:

    python3.11 -m venv .

    source bin/activate

    python3.11 -m pip install wheel

    13. Then I made a new place for the compilation to go, because it turns out /tmp is too small:

    export TMPDIR=~/piptmp

    mkdir -p $TMPDIR

    pip3 install --cache-dir=~/piptmp homeassistant==2023.6.1

    In theory, this works, allowing you to start home assistant using

    hass

    Which should complete the installation – this is a slow process because it downloads and installs more things… In all honesty, I gave up after a few hours sitting at the loading screen. But in *theory* it should work.

  • It’s a weakness

    So I’ve finally given in. Nikki has been showing off the joys of Plex. I did try it before, but I think that the woeful inadequacy of the media server (Athlon 2800+ FTW) somewhat screwed that pooch. So after various thoughts of upgrading and several occasions of looking optimistically at various upgrade options I’ve given in.

    On its way is an Athlon X4 740 with associated motherboard and 6Gb of memory.

    This should be adequate for our needs, and since it says we can share our media with friends *waves at Nikki*, it should be more than adequate for that too.

    In other news, the RiscPC’s motherboard has been washed with a great deal of isopropyl alcohol, but it still looks like cack. The area directly around the battery is looking better, but a quick nose-test of the board tells me it still reaks of battery acid. That design plan which has the fan gently wafting battery acid all over the rest of the board has really done a bit of a number on it. I’m pondering washing it with a gallon of distilled water; but the issue then is drying it. We haven’t got an airing cupboard to dry it in…so I’m a bit unsure about how to ensure it dries rapidly and without turning into a pile of oxidisation.

    The other option is to go and buy a lot more isopropyl alcohol…

    I’m also pondering whether to stick a new hard disk in. The original one in there is now about 20 years old, which is probably pushing it in hard disk terms, really. Of course, when I say ‘new’ what I really mean is ‘less old’. Since the biggest drive it can support is 128Gb, which would be beyond overkill for a machine I barely use, and this being entirely a ‘fix it before it breaks, copy the data off the old drive onto the new one’ process I’m inclined to find one of my ‘spare’ drives. Of course, then comes the joy of trying to find a spare ATA drive… I’m sure I have some, somewhere. But where is going to be an interesting question.